Sunday, March 15, 2009

Versatile Table Centerpieces for Spring and Easter

clay-pots_top-viewThis display idea can be used as a organic-style decoration on your dinner, buffet or coffee table at Easter. The squares of faux green grass are available at many craft stores (from 4”- 12” square) and range in price from $5-$14.

This fun green grass creates so much versatility for your Spring & Easter decorating! As you can see in the photo, I have loaded up 3 clay pots with the green stuff as a low centerpiece (low to create ease of conversation across the table.)
DIRECTIONS: If your container choice is deep (as in the clay pots pictured on the right), first fill them with green styrofoam blocks (cut to fit) to use up the excess depth. Place a 4” faux grass square in the center of the pot. Fill in any spots, where you can still see the green foam, with individual pieces of the faux grass, pulled from a spare square of grass. You can also add ribbon around the lip of each clay pot or even paint them. For a final decorative touch, tuck in flowers & Robin’s eggs throughout the grass.
BONUS IDEAS: position the pots on top of large faux leaves, usually available @ craft or floral supply stores, for an extra touch. Other faux grass container options: clay pot saucers, baskets, (handyman) rectangular aluminum mud pans (found in D.I.Y. stores) or planters of any shape or size.

clay-pot-with-rabbit-mini2


Spring BURST ‘O FLOWERS Ball ~ for hanging!

completed-daisy-ball-2_cropped-2 This design is a very large ball of cheery flowers that will be “the unexpected” this Spring. Consider hanging it from a chandelier, in multiples along your front porch or suspended from the ceiling on each side of your fireplace.

You will need:
8” sytrofoam ball (make
sure you take your 40% off
coupon with you!)
48 – 4” silk Gerbera Daisies
Apx. 30” of ½” wide ribbon (for
hanging)
4 yds. of 1-1/2” wired ribbon (for
bow), glue, pipe cleaner & u-
shaped wire (to secure ribbon)
styrofoam-ball-and-flowers
Begin by tying the ½”
ribbon into a knot, placing
it on the top-center of the
ball & securing it with a
u-shaped wire & a little glue.
Using a wire cutter, leave apx. a 3” stem on each flower (see above photo) & push each stem into the styrofoam ball. Continue covering ball with flowers. Make bow, secure with pipe cleaner & attach to top of ball at the base of the hanging ribbon.

Sunday, March 8, 2009

Spring Topiary ~ Perfect for Bridal Shower or Wedding too!

March 8, 2009 by seasonalhome

gerbera-daisy-topiary_close-view To make this quick & easy cutie, you will need:

Apx. 2 dozen 3” (flower head measurement) silk Gerbera Daisies
Clay pot or other floral container (check clearance aisles!)
Slim branch (2-1/2 x the height of your container)
4″ (in diameter) styrofoam ball
Apx. 2 dozen tiny, silk white daisies
Faux soil product (called “Looks Like Soil”) - or - preserved moss
Additional styrofoam piece (to fit inside container) -or- Plaster of Paris

Begin by placing (instant mix) Plaster of Paris inside the container, filling it apx. 2/3 full. Place one end of your branch into the center of your container (while plaster is still wet). Hold or prop-up branch vertically until the plaster dries. When filler is dry, add a small amount of glueto other end of branch. Immediately place center of styrofoam ball over top of branch & gently push down (apx. 2”) to secure stick inside styrofoam ball. Allow to dry. In the meantime, prepare faux dirt product or preserved moss and add it to the top of the container (if you do this while the plaster is still drying, it will keep the moss or dirt in place). Allow to dry (apx. 15 minutes). Cut the stems of each Gerbera Daisy to apx. 2″ in length. Starting at the top center, gently push each stem into the styrofoam ball, continuing until the entire ball is covered. Hot glue the small white daisies around the base of the branch & add a silk ribbon bow under the styrofoam ball for a finishing touch. This design is beautiful to display all spring and would also make the perfect compliment to a bridal shower or wedding reception too!

Spring & Easter Outdoor “DOOR” Decoration

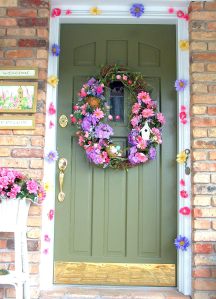
flower-garland_full-door2

This decorative garland is simple to make, will look great around your front door and be the perfect accent to a spring wreath!

To determine how long your garland will need to be, measure both sides & across the top of your doorway. Add your measurements together for your garland’s finished length.
Then, gather the following ingredients: spool of 8 lb. fishing line, spring silk flowers (3 different colors were used in the garland at left) and a low melt glue gun.
DIRECTIONS: Measure a piece of fishing line (slightly) longer than your doorway’s measurement (2 sides+ the top + apx. 4”). The 4” of extra length will allow for slight shrinkage that may result from using hot glue with fishing line. Lie your length of fishing line out on a (protected) tabletop. Beginning at one end, glue your first flower to the fishing line. Then, approximately 6” from there, glue your next flower to the line and so on. Make sure you use a small line of glue (vs. a dot) along the center back of each flower to balance the weight of your blossom along the length of the fishing line. [Assembly hint: I found it was easier to put glue on the back of the flower blossom, lie it face down on the tabletop, attach the fishing line to its back and hold the line down & in place until the glue starts to cool. Hammer small, picture hanging hardware into each top corner of doorway to hang your garland on. This a simple, light-hearted & Springy way to greet your guests at Easter!
BONUS IDEAS: Wouldn’t rows of this design, hung vertically side-by-side, make an adorable full-curtain window treatment or as a sweet valance? Or, maybe a curtain & valance, i.e. white daisy valance over a yellow daisy curtain? I can just picture it in a little girl’s room! Of course, it would probably be best to use more flowers for better coverage and to create a fuller design. Also, consider exchanging the fishing line for ribbon for this idea. And finally, if you don’t want to hang this around a doorway, consider using it as a garland for your fireplace mantel or along the eaves of your house!

Use your Easter Wreath as a Display!

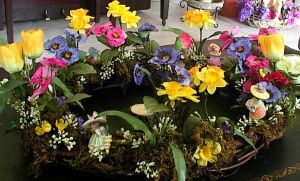
easterlivingroom_floral-table-wreath

Most people display wreaths vertically on a door or wall. This unusual idea, however, demonstrates another creative use for your decoration-in-the-round! It was born from my need to display a grouping of sweet, spring ornaments. But, this design would be just as beautiful on its own or using some-thing like Easter eggs too! Since my ornament collection consisted of little animals, dressed up in their spring finery, I decided to create a tiny, flower-dotted forest. The following are the directions so you can create your own little bog:
on one side of a grapevine wreath, glue preserved green moss. Cut single stems of silk spring flowers, at varying heights. With a touch of glue on the (non-flower) end, insert each stem into the wreath. Fill in between & underneath the flowers with faux baby’s breath or other tiny silk flowers to create a lower floral element as well. Space your ornaments (if you have a collection to use) equal distances apart. Keep them in place by using a tiny touch of (low temp) hot glue or tack-it gummy temporary adhesive (sold in office supply sections of most stores). This design idea would also be adorable stretched vertically along a fireplace mantle as a garland!
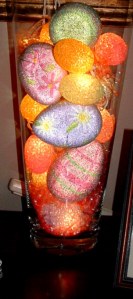
Another Option: consider featuring something in the center of the wreath, like a large candle, apothecary jar (full of glittery eggs or an Easter house on basket grass), etc.glass-vase